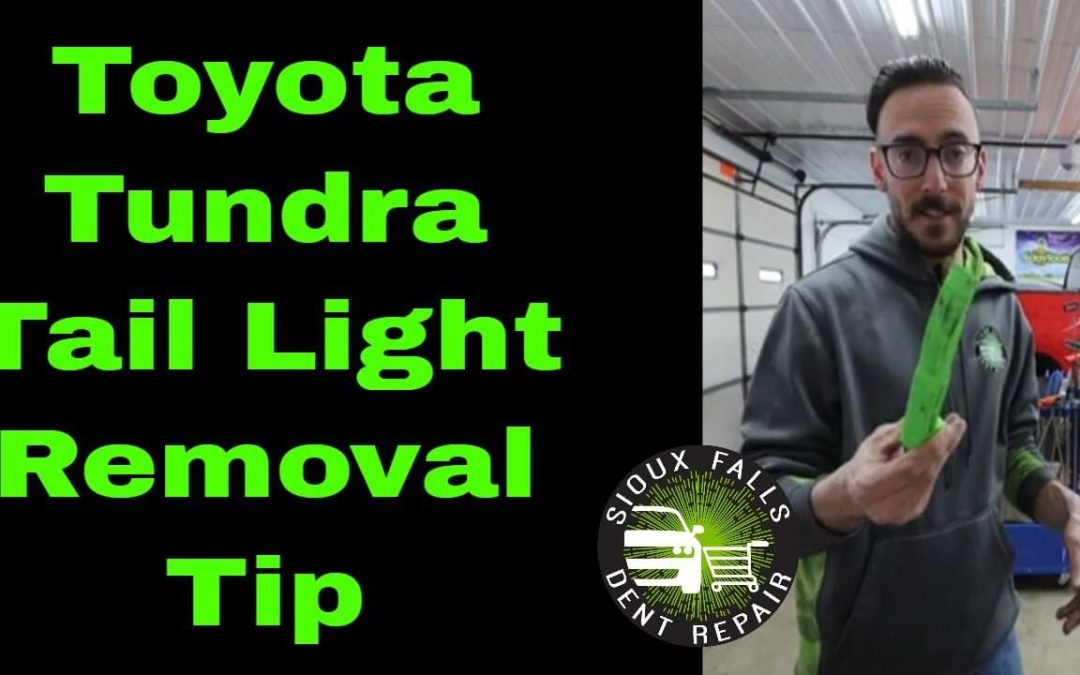
Today, Jack introduces us to the very first “Tool-Tech Tip Tuesday” episode and will take us through the steps of removing a tail light from a 2015 Toyota Tundra pick-up truck. There is a twist though, as Jack will not be using a traditional tool used for light uninstallations. Instead, he is using a window wedge from Stuckey Tools that creates a gap in the window channel – but it works, so why not?
Once the tailgate assembly is lowered, Jack shows us that two torx screws hold the tail light in place. Once those are out, Jack explains that there are a couple of guide pins that actually require the light to be pushed out sideways rather than pulled out from the back (as seen on older models).
This is where the window wedge tool comes in. Because the tool is made from plastic, there are no worries about scratching the paint or damaging the metal while removing the light. As you can see, Jack simply pushes the wedge tool into the seam of the light and it pops out easily.
If you have any damage and want us to take a look at it, reach out to us on 605-250-1023. You can also request a call back by Clicking Here!
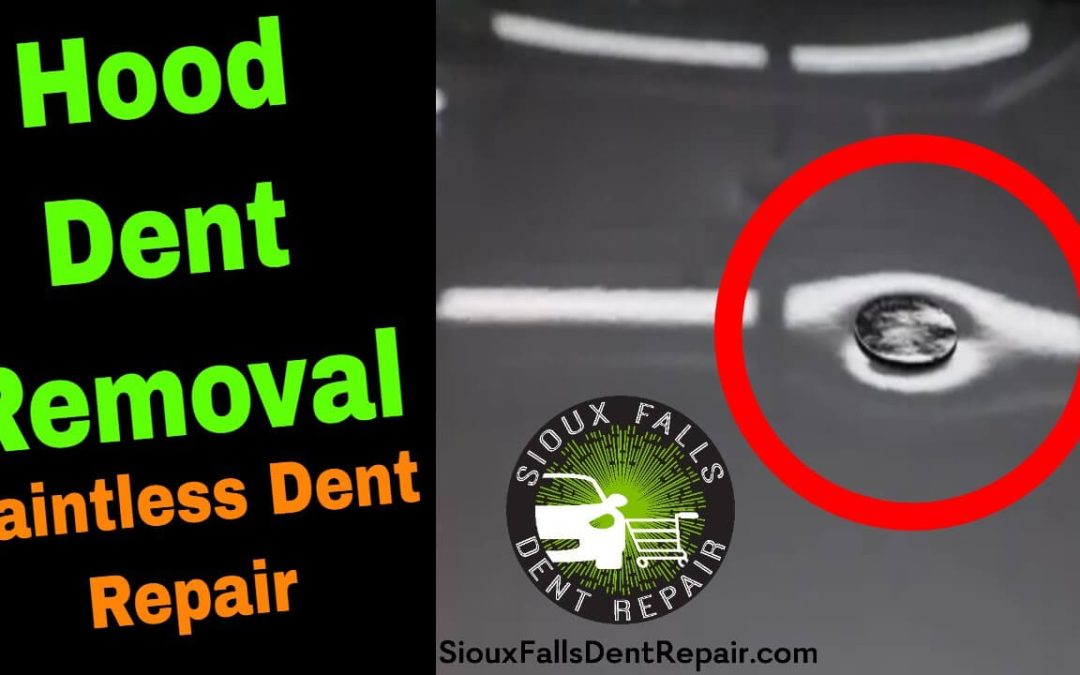
Today, Jack from Sioux Falls Dent Repair will be taking on a dented hood on a 2016 Chevrolet Suburban.
Now, the owner of this vehicle actually purchased the car with the dent in it and decided to approach us for Paintless Dent Repair as it would turn out to be a lot more affordable when compared to taking a car to a traditional body shop.
With the use of our special magnetic half dollar size coin, we can estimate the damage size and give the customer our pricing for the repair. The dent, as you can see, is bigger than the coin itself and so we price it accordingly. In order to gain access to the damaged area, we had to lift the hood and remove the insulator pad on the underside of the hood. There were a total of six clips that had to come out so that we could find a way to get our tools in and push the damage out.
As it turned out, the dent was located under a brace in the frame which makes fitting our regular tools a lot more difficult – and sometimes impossible. Luckily, in this case, we were able to get our brace styled tools under the brace and push out the damage. When the specially designed brace tools do not work, the next best thing is the glue pulling method for getting out any type of damage. Since the dent on this car was rather large, we decided to first use the glue pulling method to get rid of the majority of the damage from the outside. Once the bulk of the damage was removed with the pull tabs, we were able to get under the hood and take a closer look at the finer details of the repair. You can probably see that we are using a couple of PDR lights for this repair and the reason for this is so that we can get all the right angles of the damage and successfully push it all out without having to constantly move the light around.
In the end, getting rid of a dent like this takes more than just a couple of pull tabs and a few pushed from underneath the metal. Often, we use hundreds of small repetitive pushes to get out a dent completely. Lastly, we polish and buff the damaged area to get it back to its original state – or at least close to it.
For any kind of dent removal inquiries or questions, call or text us at 605-250-1023 to get your dented cars repaired.
Click Here to fill out your contact info to start your repair process now!
Paintless Dent Repair on a Budget – Have a Dent-Free 2021
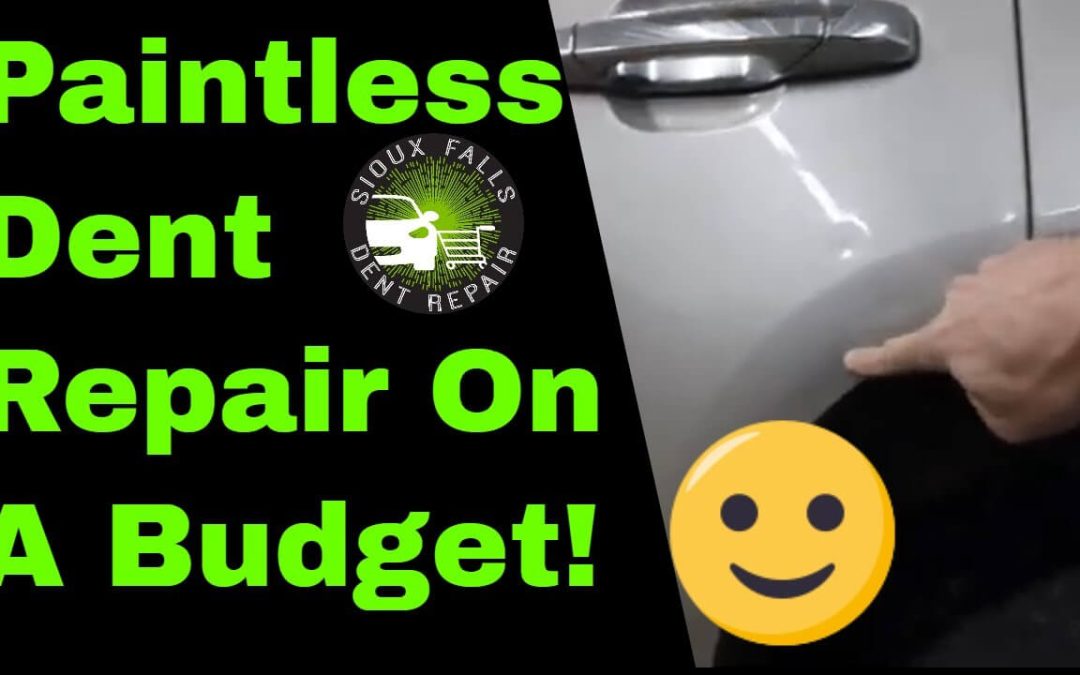
As we enter the New Year, we here at Sioux Falls Dent Repair hope all of you have a prosperous year ahead. Today, Jack is taking on a dent a customer found on the left rear door of their 2009 GMC Yukon.
With the naked eye, we can clearly see two big dents and the edge of the panel is rolled in as well. But on closer inspection, we also found a couple of smaller dents below the door handle. There is also a crack in the paint near the back end of the door. While the damage can easily be taken out, we have to apply some clear-coat touch-up paint to protect the factory paint from getting damaged even more.
The customer was looking to get the bigger dents out more than the other smaller damage around the door. The vehicle is 11-years old, so the customer wasn’t really concerned about the smaller damage. We work with the customer and ensure that they get the best results no matter what. Since the customer wasn’t really concerned about the rolled edge panel damage, we focused mainly on the bigger dents.
We started our work by placing a window guard into the window to gain access to the damaged panel. We had to use the glue-pulling method as well as our regular tools through the window space. The glue pulling method is used for getting out the majority of the damage and then we use the tools to slowly push out the rest of the damage. We can also gain access through the door to push out the damage. We normally use multiple angles to get the damage out completely and it gives us the best results.
Once all the damage is taken out, we use some minor buffing and polishing to finish the panel. This also helps us to work on the paint crack. Then we simply apply the clear-coat touch-up paint on the crack, and we’re done. The finished product, as you can see, came out really well and the customer was very happy with the results.
If you have any similar damage on your vehicle, feel free to get in touch with us through text or call us at 605-250-1023. Start your repair process now ONLINE! Click Here!
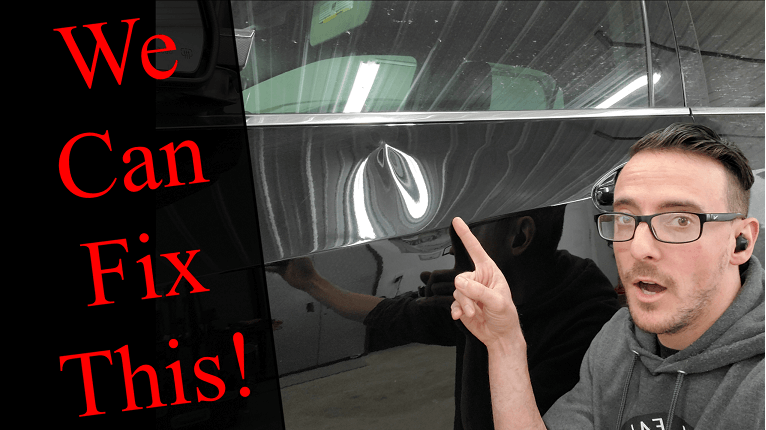
Today, we’ll be taking a look at a 2016 Chevrolet Equinox in need of a big dent removal, this has a pretty bad door dent in it. As you can see, the damage is quite severe and starts all the way near the top of the door and goes through the body line. There is even a bit of damage towards the bottom of the door which we will have to get rid of.
Starting Off, Cold Glue
To get some of the dent out from the door, we will be using a product called Cold Glue and it is available from Glexo. The Cold Glue tab is fastened to the Slide Hammer that we use here in the Sioux Falls Dent Repair shop and the tab is then applied to the damaged area. By simply pulling the Slide Hammer back and forth a few times, we can get some of the damage out.
Next, we switch over to hot glue pull tabs – something used quite commonly in the PDR world. The tabs we’re using for this job is from Black Plague and it is from the Ice Tab series. We’ll be using the Elim A Dent glue gun with Cam Auto Glue to pull out some of the remaining damage. The glue takes a little longer to dry, but it offers a better and stronger pull. To pull on the glue tab, we’ll be using the KECO K-Bar which gives us a lot of leverage when it comes to pulling on tabs and getting out dents.
With the help of the PDR lights, you can see how all that pulling got rid of the majority of that large dent in the door. Once we finish working on the door from the front, we can then remove the door, door panel and start pushing out the damage from the back. We also have to remove the glass, the reason being is this glass is special to this type of vehicle, find out what’s different about this glass by Clicking Here. After we remove the door panel, we gain a lot more access to the back of the door panel and this lets us push out the remaining damage with our tools.
After removing the door and placing it under the PDR lights, we can see how much of the damage is still left and we can then figure out the kind of tools we would require for the job. Moving over to the lower side of the door, we have to hammer down the damage with a special tool. It takes a multiple hits and quite a bit of time to get the damage out 100%, but it is still faster than taking the car to a body shop.
See A Real Demonstration Here:
If you want to know more about Sioux Falls Dent Repair, go ahead and follow us on:
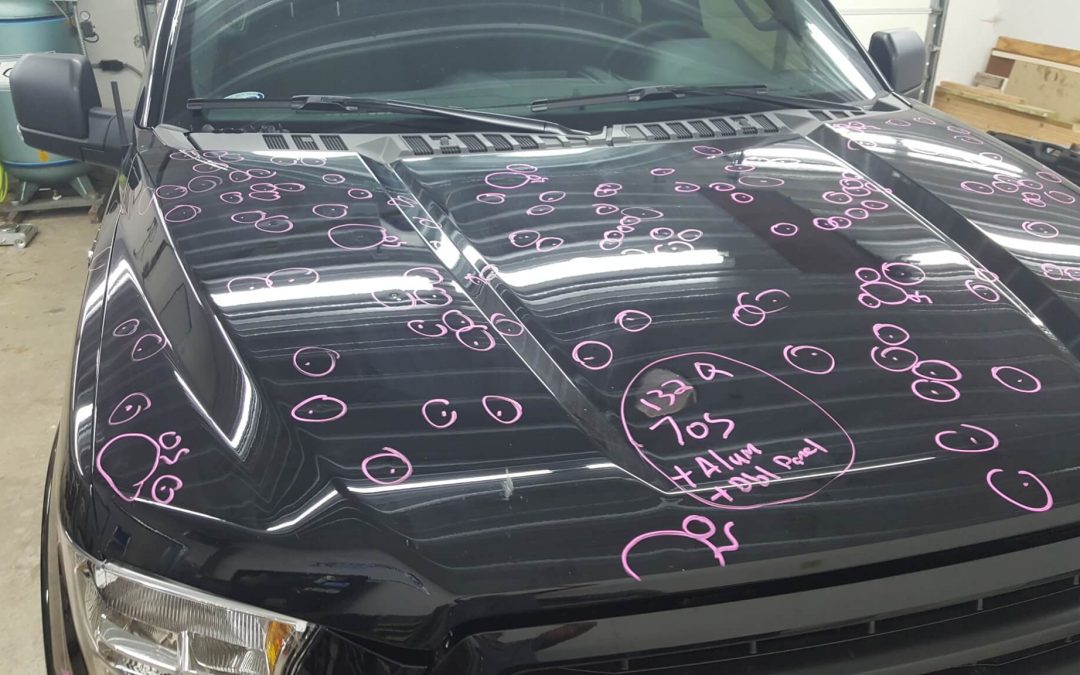
Today, Jack from Sioux Falls Dent Repair gives us a detailed look into how they go about writing a hail damage estimate, we will call it Hail damage estimating 101. Every PDR case is different and requires skilled technicians to assess the damage and come up with a correct estimate.
First Things First
The first thing we do in the shop is get the damaged area cleaned thoroughly so that we can see all the dents, dings, and scuffs easily. After the panel is cleaned, we use specialized PDR lights to get a better look at the surface. In this case, the vehicle we’re looking at is a 2017 Ford F150 and it is a relatively new car with just over 1,700 miles on it. As you can see, the PDR lights allow us to see all the dents and dings in the hood of this truck.
Every dent we find is circled first so that we don’t miss out on any damage later on. Then we use special sizing coins to determine the size of each dent. The coins range from quarter size to half dollar size and is placed in the dent to see how big or small it is. From the information we get with the coin sizing, we can go ahead and get the correct pricing as well. When we come up against a dent that is bigger than a half dollar, we mark it with “OS” which stands for oversized and we price those dents accordingly as well.
We found a total of 132 quarter sized dents and 7 oversized ones. Along with that, another thing we took into consideration when pricing the repair for this truck was that it was made from aluminum. Also, the underside of the hood was almost completely braced which means we had very little access to the damaged area with our regular tools. With this in mind, we had to use the glue pulling technique to get most of the damage out.
Some Things Need To Be Taken Apart
As you can see, as indicated with the letters R&I (remove and install), we also had to remove the headlight and the fender flare to take out the damage from the fenders on both sides of the vehicle.
If you have any questions or queries about hail damage or want some information on what we do here at Sioux Falls Dent Repair,
In today’s video, Jack takes us through a hail damage estimate for a 2015 Honda Fit that came into the Sioux Falls Dent Repair shop. As you can see, the damage is quite severe and even caused the paint in the roof to crack in multiple spots.
For the customer to claim their insurance, we needed to take photographs and even mark off the severely damaged areas. The car itself, as you can see, is covered in “oversized” dents which are indicated with “X” marks. In terms of size, an oversized dent is any dent that is larger than a half dollar coin.
The roof and hood were written as replacement pieces because of the severity of the damage and that is what we used to write up our estimate. The dents are all across the body of the car and has even caused the paint to crack in many spots. In some spots, the glass will also have to be removed and reinstalled once the job is complete.
Unfortunately, once the estimate is made, the car is going to be a complete loss for the customer and they will have the option to either get reimbursed or buy it back and get it fixed afterwards. The customer also has a tow hitch attached to the front of the vehicle which means that it will have to be removed and will be included in the eventual cost. We also came across a hairline dent between the side mirror and the frame of the vehicle which will need work. Also, there are signs of previous PDR work on this car, but it isn’t complete and isn’t a good job either.
So, that is how we at Sioux Falls Dent Repair go about writing up an estimate for hail damaged car. We mark off the larger dents and any extreme damage, we take to a body shop for repair or replacement.
Watch the whole process here:
If you have any hail damage that you want us to take a look at, go ahead and call or text us at 605-250-1023.